SELF-HOST N8N WITH DOKPLOY: COMPLETE VPS SETUP GUIDE
After exploring various automation tools, I decided to self-host n8n for maximum flexibility and data privacy. Instead of using n8n Cloud, I chose to deploy it on my own VPS using Dokploy - a modern, open-source platform that makes Docker deployments incredibly simple.
In this guide, I'll walk you through the entire process.
Why Self-Host n8n?
Before we dive in, here's why self-hosting makes sense:
- Cost Effective - Pay only for VPS (~$5-10/month) vs n8n Cloud pricing
- Data Privacy - Your automation data stays on your server
- No Execution Limits - Run as many workflows as your server can handle
- Custom Integrations - Install community nodes without restrictions
Prerequisites
Before starting, make sure you have:
- A VPS with Ubuntu 22.04 or later
- A domain name (for custom domain setup)
- Basic familiarity with terminal/SSH
VPS Specifications
For this tutorial, I'm using a 4GB RAM / 2 vCPU instance which handles my automation workflows perfectly.
Step-by-Step Guide
1. Prepare Your VPS
First, SSH into your VPS and update the system:
ssh root@your-server-ipapt update && apt upgrade -y2. Install Dokploy
Dokploy provides a one-line installation script that sets up everything:
curl -sSL https://dokploy.com/install.sh | shThis will install:
- Docker & Docker Compose
- Traefik (reverse proxy with auto SSL)
- Dokploy dashboard
After installation, you'll see the Dokploy dashboard URL and credentials.
3. Access Dokploy Dashboard
Open your browser and navigate to:
http://your-server-ip:3000Create your admin account on first login.
4. Configure Custom Domain
Before deploying n8n, let's set up custom domains for n8n.
DNS Configuration
Go to your domain registrar (Cloudflare, Namecheap, etc.) and add these A records:
| Type | Name | Value | TTL |
|---|---|---|---|
| A | n8n | your-server-ip | Auto |

5. Deploy n8n
Now for the main event - deploying n8n!
- In Dokploy, click "Create Project"
- Name it "automation" or similar
- Click "Create Service"
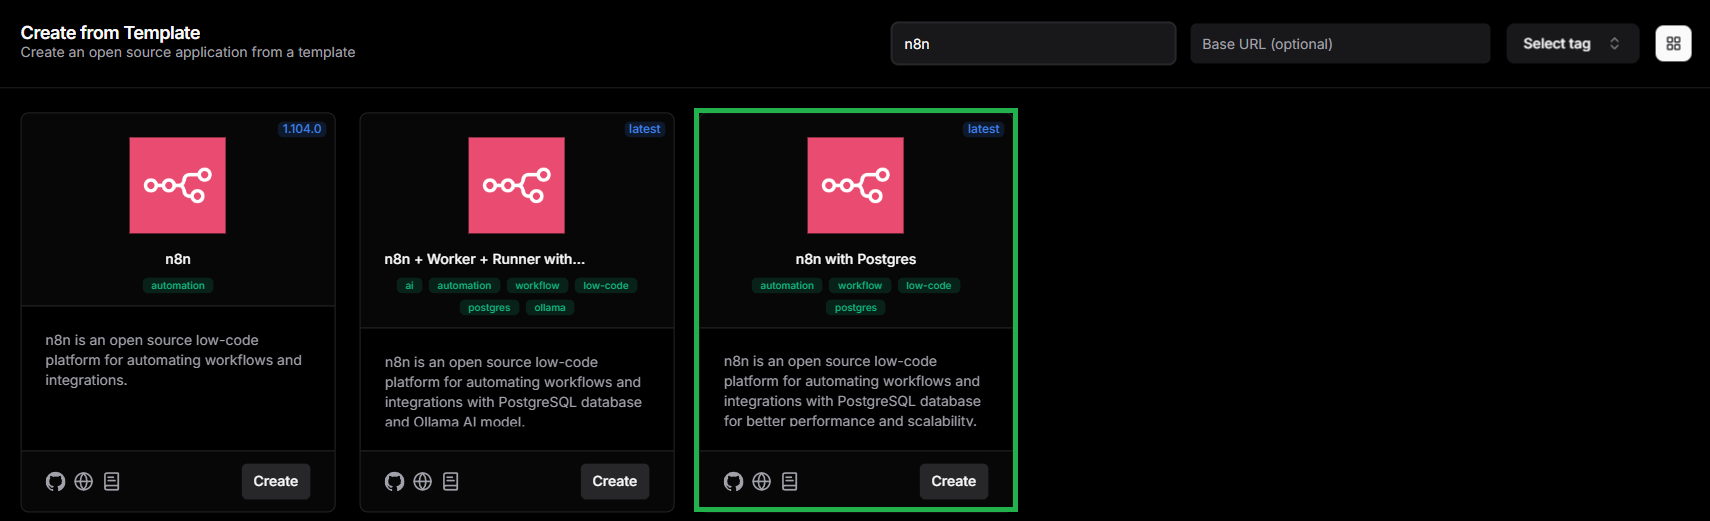
- Choose "Template" and search "n8n"
- Select the "n8n with Postgres" template
- Click "Create" and "Confirm"
Dokploy will generate this Docker Compose configuration. You can review it in the General tab:
services:
  postgres:
    image: postgres:17-alpine
    restart: unless-stopped
    environment:
      - POSTGRES_USER=${POSTGRES_USER}
      - POSTGRES_PASSWORD=${POSTGRES_PASSWORD}
      - POSTGRES_DB=${POSTGRES_DB}
    volumes:
      - postgres_data:/var/lib/postgresql/data
    healthcheck:
      test: ["CMD-SHELL", "pg_isready -U ${POSTGRES_USER} -d ${POSTGRES_DB}"]
      start_period: 30s
      interval: 10s
      timeout: 5s
      retries: 5

  n8n:
    image: n8nio/n8n:latest
    restart: unless-stopped
    environment:
      - DB_TYPE=postgresdb
      - DB_POSTGRESDB_HOST=postgres
      - DB_POSTGRESDB_PORT=5432
      - DB_POSTGRESDB_DATABASE=${POSTGRES_DB}
      - DB_POSTGRESDB_USER=${POSTGRES_USER}
      - DB_POSTGRESDB_PASSWORD=${POSTGRES_PASSWORD}
      - N8N_ENCRYPTION_KEY=${N8N_ENCRYPTION_KEY}
      - N8N_HOST=${N8N_HOST}
      - N8N_PORT=5678
      - N8N_PROTOCOL=http
      - NODE_ENV=production
      - WEBHOOK_URL=https://${N8N_HOST}/
      - GENERIC_TIMEZONE=${GENERIC_TIMEZONE}
      - N8N_SECURE_COOKIE=false
    volumes:
      - n8n_data:/home/node/.n8n
    depends_on:
      postgres:
        condition: service_healthy

volumes:
  n8n_data:
postgres_data:Update Environment Variables in Dokploy:
- Go to your Environment tab
- Update these variables for your domain:
-
N8N_HOST= n8n.yourdomain.com
6. Configure n8n Domain
After deploying, configure the domain for n8n:
- Click on the "n8n-with-postgres" service
- Go to "Domains" tab
- In the Service Name dropdown, select:
n8n - Add host:
n8n.yourdomain.com - Set port:
5678 - Enable "HTTPS"
- Click "Create"
Tip: SSL certificate generation may take 1-2 minutes.

7. Access n8n
Visit your custom domain:
https://n8n.yourdomain.comCommon Pitfalls
- SSL not working - Ensure DNS is propagated (can take up to 24 hours)
- Port conflicts - Make sure ports 80, 443, 5678 are available
Cost Breakdown
| Item | Monthly Cost |
|---|---|
| VPS (4GB RAM) | ~$6 |
| Domain | ~$1 (yearly/12) |
| Total | ~$7/month |
Compare this to n8n Cloud at $20+/month for similar capabilities!
Learning Journey Highlights
VPS Setup
- Ubuntu server configuration
- SSH key management
- Basic Linux commands
Dokploy Deployment
- One-click Docker deployments
- Automatic SSL with Traefik
- Service management
DNS Configuration
- A record setup
- Domain propagation
- SSL certificate generation
Resources
Next Steps: Building AI Workflows
Now that n8n is running, our next posts will cover:
- Integrating OpenAI/LLMs with n8n
- Building RAG pipelines with Supabase Vector
- Creating AI chatbots with webhooks